
A photo-to-notes workflow should leave you with a note you can trace back to the image and use without staring at the answers. That means preserving table headings, diagram labels, signs, and context before turning the extracted text into study material.
Start with the Image to Notes AI tool for a readable textbook image, whiteboard photo, screenshot, or handwritten sheet. This guide explains what to capture, what to check, and how to turn the checked result into practice. The worked example below includes a source image, a completed correction, and an editable practice pack.
Key takeaways
- Capture one study job at a time, including the labels and context needed to interpret it.
- Check the smallest important text at full size; retake an unreadable image instead of guessing.
- Preserve tables and diagrams as relationships, not a loose list of extracted words.
- Keep source facts separate from explanations added later.
- Attempt a question before opening the checked answer, then repair the specific mistake.
Worked example: a screenshot to a checked study note
The slide, numbers, draft errors, and repair log here are an original editorial teaching example, created September 21, 2026. The 200 students are fictional. This is not a screenshot of an AI product, actual AI-generated output, or a test of any tool's accuracy. A clean digital slide lets you inspect the verification process; it does not demonstrate recognition of faint handwriting or a blurred photograph.
1. Read the complete source image
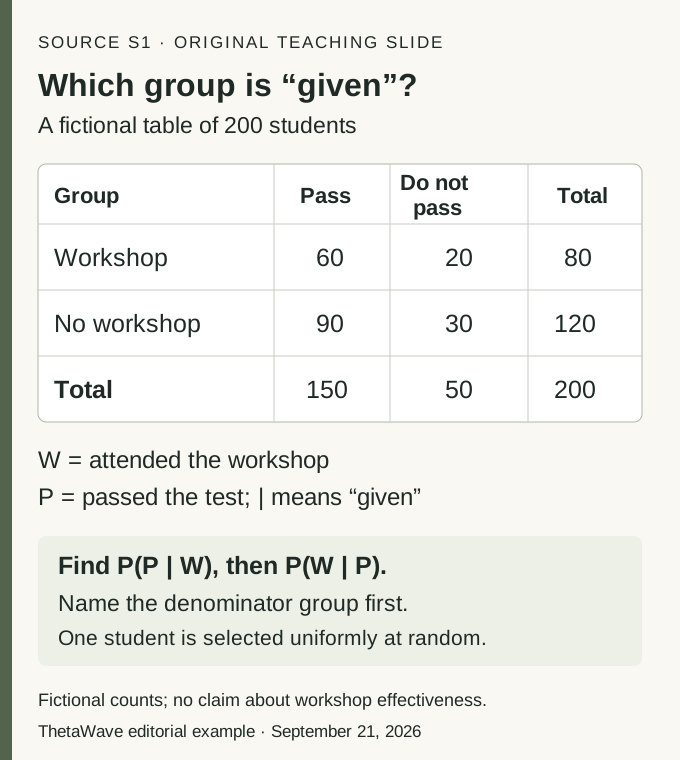
Readable transcript of S1: choose one student uniformly at random from a fictional group of 200. Of the 80 workshop attendees, 60 pass and 20 do not pass. Of the 120 non-attendees, 90 pass and 30 do not pass. The column totals are 150 who pass and 50 who do not. Let W mean attended the workshop and P mean passed the test. The vertical bar means “given.” Find P(P | W), then P(W | P), naming the denominator group first.
Keep the title, all column headings, row labels, totals, and the instruction in the image. A crop containing only 60, 20, 90, and 30 loses the information needed to interpret those numbers.
2. Ask for extraction before explanation
A reusable instruction for an image-capable tool is:
Transcribe the title, every row and column heading, all cells, and notation. Keep the table structure. Mark unreadable text [unclear]; do not guess. Then organize a study note. Label anything added beyond the source. Keep source identifier S1 beside the table and calculations.
The instruction gives you something specific to verify; it cannot guarantee correct recognition. If your tool has no custom instruction field, use it as your own review checklist after extraction. Never fill a cropped or unreadable cell using what would make the totals convenient.
3. Repair the draft against the image
Deliberately flawed draft — do not study this version: “Workshop total = 60. P(P | W) = 60/200 = 30%. P(W | P) = P(P | W) = 75%.”
Three separate checks reveal why the draft fails:
- Cell versus row total: S1 places 60 under Pass, not Total. The workshop row is 60 + 20 = 80. Correct the extracted total before calculating.
- Missing condition: “Given W” restricts the denominator to 80 attendees. The correct calculation is 60/80 = 75%; 60/200 answers the different question of attending and passing in the whole group.
- Reversed condition: “Given P” restricts the denominator to the 150 students who pass. The correct calculation is 60/150 = 40%. Swapping the labels after and before the bar does not preserve the answer.
The arithmetic is not the only check. Match each number to its row and column in S1. A note can contain correctly recognized digits and still describe the wrong relationship.
4. Keep the finished note, with additions labelled
Checked note — source S1. Goal: name the given group before choosing a denominator. These are counts, not percentages. Row totals: 60 + 20 = 80 and 90 + 30 = 120. Column totals: 60 + 90 = 150 and 20 + 30 = 50. Both paths give 200 people.
From the source counts: P(P | W) = 60/80 = 0.75 = 75%, using the workshop row. P(W | P) = 60/150 = 0.40 = 40%, using the pass column.
Added explanation: when the conditioning probability is nonzero, P(A | B) = P(A and B)/P(B). For equally likely people in a count table, restrict the denominator to group B. This explanation is checked against OpenStax's probability rules; it is not presented as extra text extracted from S1. The fictional table does not establish a workshop's effect on grades.
5. Try the note with the answers hidden
Answer first. Use the source counts if needed, but close the worked calculations. The third question changes the numbers so that recognition of the earlier fraction is not enough.
1. Given no workshop, what is the probability of passing?
The denominator is the 120 non-attendees. Of them, 90 pass, so 90/120 = 75%. Using 200 would drop the condition.
2. Given a pass, what is the probability of no workshop?
The denominator is the 150 students who pass. Of them, 90 did not attend, so 90/150 = 60%. The conditioning group is the pass column.
3. New counts: attendees 48 pass/32 do not; non-attendees 72 pass/48 do not. Find P(W | P).
Given a pass, use 48 + 72 = 120 people. The 48 workshop attendees are part of that group, so 48/120 = 40%. The fraction 48/80 = 60% would answer the reversed question P(P | W).
Completed fictional repair log: the learner writes 48/80 = 60% for question 3. The error is choosing the workshop row when “pass” is the given condition. They underline “given pass,” rebuild the denominator as 48 + 72, and retry: 48/120 = 40%. That fixes this attempt; it is not evidence of lasting mastery.
Download the editable source, checked note, practice and repair log (TXT). The pack also contains a blank reusable note. Open it in a text editor, complete “Your reusable note” with your own material, and keep its answer key below your attempt. This is an editable text file, not an automatic upload or product export.
Step 1: Capture a readable study unit
Choose the job before you take the photo: reconstruct a worked calculation, explain a process, compare two theories, or recall a set of terms. Include the information that makes that job possible.
For a textbook page, keep the heading, relevant paragraphs, page number, and any diagram caption. For a whiteboard, take a wide reference image for the overall argument, then closer images for small text; keep their order. For handwriting, check faint strokes, crossings-out, subscripts, and minus signs. For a screenshot, remove unrelated interface content while retaining the question, labels, and legend.
Place paper flat, hold the camera parallel, and avoid glare and shadows. Review the smallest meaningful text at full size. Google's Drive scanning instructions describe crop, rotate, and related scanning controls; the same framing check helps you keep the useful source intact. If a symbol remains unclear, recapture it. A sharper-looking note is not proof that the symbol was read correctly.
Step 2: Upload a coherent batch and preserve context
Use the smallest set of images that forms one complete topic. Keep an overview plus necessary detail images together, in reading order. Avoid mixing unrelated courses or combining a diagram with the wrong caption. For a multi-page digital file, use the PDF to Notes workflow instead of making unnecessary screenshots.
Name the source and state what you want to practice. Ask for headings, exact terminology, equations, and uncertainties to remain visible. Check the current tool's supported input and account requirements; do not assume that every photo-to-notes service handles every image format or permits unlimited free processing.
Step 3: Verify meaning as well as transcription
Compare the draft side by side with the original before turning it into flashcards. Work through these checks:
- Words and symbols: names, dates, signs, units, exponents, subscripts, negations, and qualifiers.
- Layout: which value belongs to which row, which caption belongs to which figure, and where a sequence begins.
- Diagrams: arrow direction, axes, legend, labels, and any missing relationship. A text list of labels may not preserve the diagram's meaning.
- Completeness: required edges, steps, conditions, and corrections are still present.
- Traceability: important claims point to a named source image; uncertain material stays marked until resolved.
S1 illustrates a layout error and two interpretation errors using perfectly legible digits. With an actual blurry photo, first repair the source image; do not try to rescue an unreadable source through confident prose.
Step 4: Add structure and practice
Once the source facts are checked, organize the note around the assessment. For a process, show the starting condition, sequence, result, and what would interrupt it. For a comparison, use the same criteria on both sides. For a worked problem, state the givens, assumptions, calculation, and units. Mark your added explanation or instructor context separately from extracted content, as in the S1 note.
Then attempt an answer before looking. Cornell's effective study strategies describes retrieval through writing, diagrams, and graphs. Use short cards for compact facts, redraw a process from memory, and use a new problem when the course tests application. A copied paragraph does not show whether you can solve the next question.
The Flashcard Maker and Quiz Maker are possible next steps after verification. If you need a schedule as well as an attempt, see active recall and spaced repetition. Start with the particular relationship you missed instead of generating a larger deck by default.
How ThetaWave fits the workflow
ThetaWave publishes this guide. Its current Image to Notes page describes creating editable notes from study images and continuing into flashcards or quizzes. Use the same source checks regardless of which tool you choose. The example above demonstrates the editorial checking method; no model generation was performed to produce it.
For a camera roll, begin with one readable unit, retain the original image, and compare its labels and conditions with the note. Continue only when you can explain what each part means. For courses that combine images with PDFs, recordings, and webpages, the broader AI notes maker study workflow helps you choose the source path.